
How to Get Ready for a Home Inspection?
Selling your home is an exciting yet nerve-wracking journey, and one of the most critical steps is the home inspection. Imagine receiving a great offer, only to have the deal falter because of unexpected issues uncovered during the inspection. A well-prepared home can prevent this, boosting buyer confidence and keeping your sale on track.
By focusing on staging, decluttering, and cleaning, you can showcase your home’s best features and ensure a smooth inspection process. In this blog, we’ll guide you through practical steps to prepare your home for inspection, address common issues that could derail your sale, and set you up for success. Whether you’re actively listing or just considering selling soon, these tips will help you maximize your home’s appeal and sail through the inspection with ease.
What Is a Home Inspection and Why Does It Matter?
A home inspection is a thorough evaluation of your home’s condition, conducted by a professional inspector to assess its structural integrity, systems, and safety features. For sellers, it’s a pivotal moment in the home-selling process, as it directly impacts buyer perceptions and negotiations. Buyers rely on the inspection to identify any repairs needed, while you, as the seller, can use it to justify your asking price or address concerns proactively. Inspectors typically examine key areas like the roof, HVAC system, plumbing, electrical wiring, and foundation, often paying close attention to energy-efficient features or smart home technology, which are increasingly valued in 2025.
A successful inspection can reinforce your staging and cleaning efforts, showing buyers your home is well-maintained. Conversely, overlooked issues can lead to price reductions or lost deals, making preparation essential. By decluttering and organizing your space, you not only make the inspector’s job easier but also highlight the care you’ve put into your home, potentially speeding up the sale.
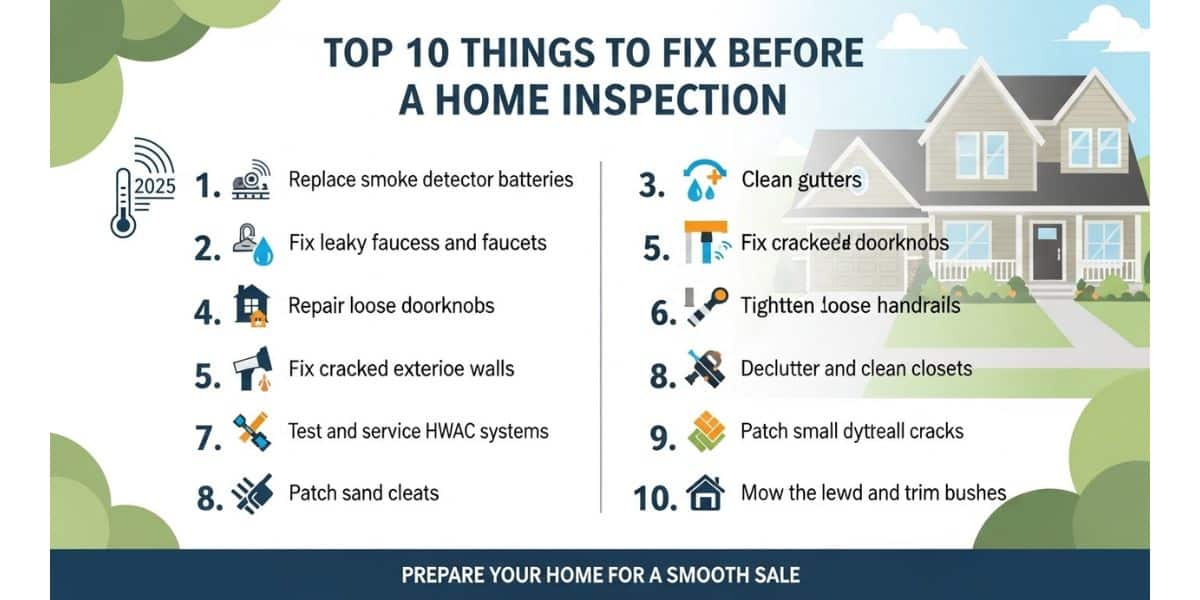
Start with a Pre-Inspection Checklist
Before the inspector arrives, take proactive steps to ensure your home is ready to shine. Begin with a self-inspection to spot obvious issues that could raise red flags, such as leaky faucets, cracked drywall, or creaky floors. Walk through your home as if you were a buyer, noting areas that need attention. This aligns with your staging efforts, as a tidy, well-maintained home creates a strong first impression.
Consider hiring a professional for a pre-listing inspection to uncover hidden problems, like outdated wiring or minor roof damage, before they surprise you. While optional, this can save you from costly negotiations later. Next, gather documentation of recent maintenance or upgrades—think HVAC service records, new appliance warranties, or roof repair receipts. These documents reinforce your home’s value and complement your decluttering and cleaning efforts by proving the home’s upkeep.
Focus on minor fixes to enhance your staging: repaint scuffed walls in neutral tones to appeal to buyers, replace burnt-out light bulbs to brighten spaces, and tighten loose cabinet handles for a polished look. Declutter countertops, closets, and storage areas to make rooms feel spacious and inviting, as cluttered spaces can suggest a lack of care to inspectors and buyers alike. Thorough cleaning is key—scrub floors, wash windows, and dust surfaces to present a spotless home. These steps not only prepare you for the inspection but also align with best practices for selling your home quickly and at top value.
Key Areas to Focus On Before the Inspection
To ensure your home shines during the inspection and supports your selling efforts, address key areas that inspectors scrutinize. These fixes enhance your staging, decluttering, and cleaning efforts, making your home more appealing to buyers and reducing the risk of inspection issues derailing your sale.
- Exterior: Maintain your home’s exterior by cleaning gutters, repairing cracks in driveways/walkways, ensuring proper drainage, and trimming overgrown plants to prevent damage and enhance curb appeal.
- Interior: Address minor interior repairs like leaky faucets and running toilets. Test and replace smoke/carbon monoxide detector batteries. Ensure windows and doors operate smoothly. Declutter and clean all spaces.
- Systems: Get HVAC systems tuned up and keep records. Check the water heater for leaks. Test and replace faulty electrical outlets. These steps prepare for inspection and highlight home quality.
- Safety: Secure loose handrails, repair uneven flooring, and cover exposed wiring to address potential hazards.
- Energy Efficiency: Highlight and clean energy-efficient upgrades like insulated windows, smart thermostats, or appliances. Provide documentation to support their value.
By addressing these trouble spots, you’ll minimize inspection surprises and present a well-maintained home that’s ready for a quick sale.
Day-of-Inspection Tips for a Smooth Process
The day of the home inspection is your chance to showcase your staging, decluttering, and cleaning efforts while ensuring the process goes smoothly. A well-prepared home not only impresses the inspector but also reinforces buyer confidence, helping you move closer to closing the sale.
- Ensure Accessibility: Clear access to key areas like the attic, basement, crawl spaces, and utility panels (e.g., electrical box, water heater). Remove clutter such as boxes or furniture blocking these spaces, as inspectors need unobstructed access to evaluate systems. This aligns with your decluttering efforts, making your home feel organized and spacious for both the inspector and potential buyers.
- Clean and Declutter: A spotless home signals meticulous care, which can positively influence the inspector’s perception. Deep-clean high-traffic areas like kitchens and bathrooms, paying attention to grout, fixtures, and appliances. Declutter countertops, shelves, and storage areas to emphasize space and functionality, reinforcing the staging you’ve done for showings. A clean, uncluttered home also allows inspectors to focus on systems rather than navigating mess.
- Provide Utilities: Ensure all utilities—electricity, water, and gas—are turned on, as inspectors need to test systems like HVAC, plumbing, and appliances. Verify that pilot lights are lit for gas appliances and that thermostats are set to demonstrate functionality. This step supports your selling efforts by showing buyers that all systems are operational.
- Remove Pets and Occupants: Arrange for pets and family members to be out of the home during the inspection to avoid distractions. Pets can interfere with the inspector’s work, and occupants may unintentionally influence the process. A quiet, empty home allows the inspector to focus, aligning with your goal of presenting a professional, move-in-ready property.
- Be Available but Not Intrusive: Be reachable by phone or text for any questions the inspector might have, but avoid staying on-site during the inspection. Hovering can seem like you’re trying to influence the process, which may raise concerns for buyers. Instead, let your staging and cleaning efforts speak for themselves, showcasing a home that’s ready for its next owner.
These day-of tips ensure the inspection runs smoothly, complementing your efforts to sell your home quickly and effectively.
What to Do After the Inspection
Once the home inspection is complete, the results can significantly impact your sale, so handling them strategically is key to keeping the deal on track. Your staging, decluttering, and cleaning efforts will have set a strong foundation, but the inspection report may still highlight areas needing attention. Here’s how to navigate the results to maintain buyer interest and close the sale.
- Review the Report Carefully: Work with your real estate agent to thoroughly review the inspection report. Identify major issues (e.g., structural or safety concerns) versus minor ones (e.g., cosmetic fixes like chipped paint). Understanding the report helps you prioritize responses that align with your goal of selling efficiently.
- Decide on Repairs: Focus on addressing safety or structural issues, such as faulty wiring or a leaking roof, as these are often non-negotiable for buyers. For minor issues, consider offering a repair credit instead of fixing them yourself, which can save time and appeal to buyers looking for flexibility. Use documentation from your pre-inspection preparations (e.g., HVAC service records) to show that major systems are in good condition, reinforcing the value of your well-maintained home.
- Negotiate Strategically: Approach negotiations with a clear strategy. If the buyer requests repairs, counter with solutions that balance cost and appeal, such as splitting repair costs or lowering the sale price slightly. Highlight your staging and cleaning efforts to remind buyers of the home’s overall quality, which can strengthen your position during negotiations.
- Prepare for Follow-Ups: If you make repairs, buyers may request a re-inspection to verify the work. Coordinate with contractors to ensure timely fixes, and keep records of all repairs to share with the buyer. This transparency builds trust and supports your efforts to present a move-in-ready home.
By handling inspection results proactively, you can address buyer concerns while maintaining the momentum of your sale. Your preparation—through staging, decluttering, and cleaning—will help ensure the report reflects a well-cared-for home, paving the way for a successful closing.

Common Mistakes to Avoid
Even with careful staging and cleaning, sellers can make missteps that jeopardize a smooth home inspection and, ultimately, the sale. Avoiding these common mistakes will keep your selling process on track and ensure your home leaves a positive impression on both inspectors and buyers.
- Ignoring Small Issues: Minor problems like a dripping faucet, a loose cabinet door, or a burnt-out light bulb can signal neglect to inspectors and buyers, undermining staging efforts. Address these small fixes early.
- Overloading the Inspector with Questions: Bombarding the inspector with questions or explanations can seem like you’re trying to influence their assessment, raising red flags. Let your home speak for itself; direct questions to your agent.
- Failing to Disclose Known Issues: Hiding known problems can erode buyer trust and lead to legal complications. Be upfront about issues, using documentation to show resolutions.
- Neglecting Curb Appeal: An unkempt yard or peeling exterior paint creates a negative first impression. Invest time in cleaning the exterior, mowing, and refreshing outdoor areas.
By steering clear of these pitfalls, you’ll ensure your home inspection supports your selling goals, showcasing a move-in-ready home that buyers can trust.
Conclusion
Preparing for a home inspection is a critical step in selling your home, and with the right approach, you can make the process seamless and successful. By focusing on staging, decluttering, and cleaning, you create a welcoming and well-maintained home that impresses inspectors and buyers alike. Addressing common trouble spots, ensuring accessibility on inspection day, and handling results strategically will minimize surprises and keep your sale on track. In 2025, buyers are looking for homes that are move-in ready and energy-efficient, so your efforts to present a polished property can lead to a faster sale at a better price.
Start your pre-inspection checklist today—walk through your home, tackle minor repairs, and organize documentation to showcase your home’s value. Consult with your real estate professional for tailored advice to ensure every detail is covered. With thorough preparation, your home will not only pass the inspection but also stand out in a competitive market, bringing you closer to a successful closing.